Build a Fully Agentic AI Booking System for Your Business With Knoon in Less Than an Hour
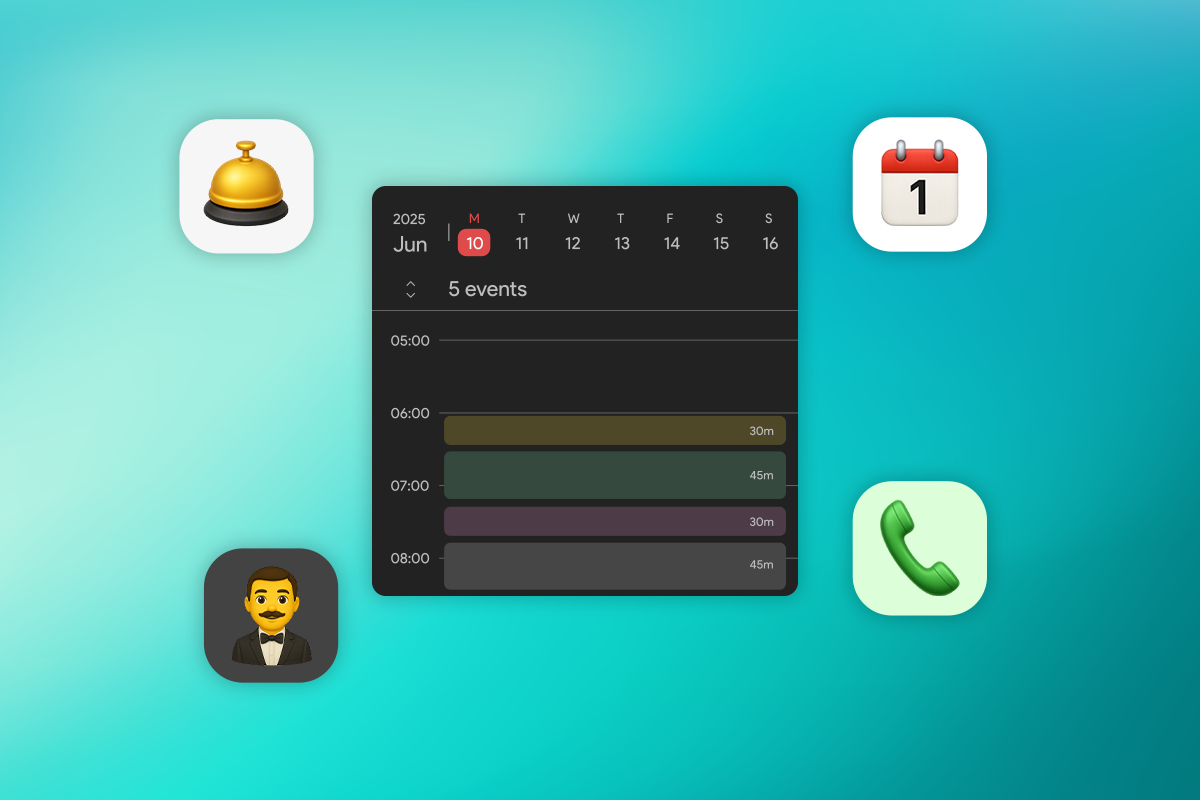
If you run a business such as a restaurant, salon, clinic, consultancy, or service shop, managing bookings manually can be time consuming. With Microsoft Bookings and Knoon’s AI powered agents, you can create a fully automated scheduling system in under an hour. Here is how it works and why this setup is so effective.
What Are Microsoft Bookings and Knoon?
Microsoft Bookings is a powerful scheduling tool included with Microsoft 365. It lets you set up services, define staff availability, manage calendars, and allow clients to book appointments online or through Teams and Outlook. It removes friction from scheduling but still requires customers to navigate booking pages and staff to manage changes manually.
Knoon enables true autonomy on top of Bookings. Its agentic AI understands natural language, handles bookings, rescheduling, and cancellations, and coordinates everything behind the scenes. Instead of clicking through forms, customers simply chat with your agent and the system takes care of the rest.
Benefits of an Agentic AI Booking System
Always Available 24/7, Instant Confirmations & Effortless Changes
Customers can book at any time through chat, even after hours.
Appointments are verified and confirmed immediately, without any staff intervention. Users can request changes in natural language, and the agent automatically manages rescheduling or cancellations on their behalf.
Reduced Administration
Research from the McKinsey Global Institute shows that many administrative tasks have a 30 to 60 percent automation potential, especially work involving scheduling, coordination, and routine data handling. By shifting booking and rescheduling tasks to Knoon’s agentic AI, businesses can significantly reduce manual workload and free staff to focus on customer service rather than administrative operations.
Consistent Calendar sync
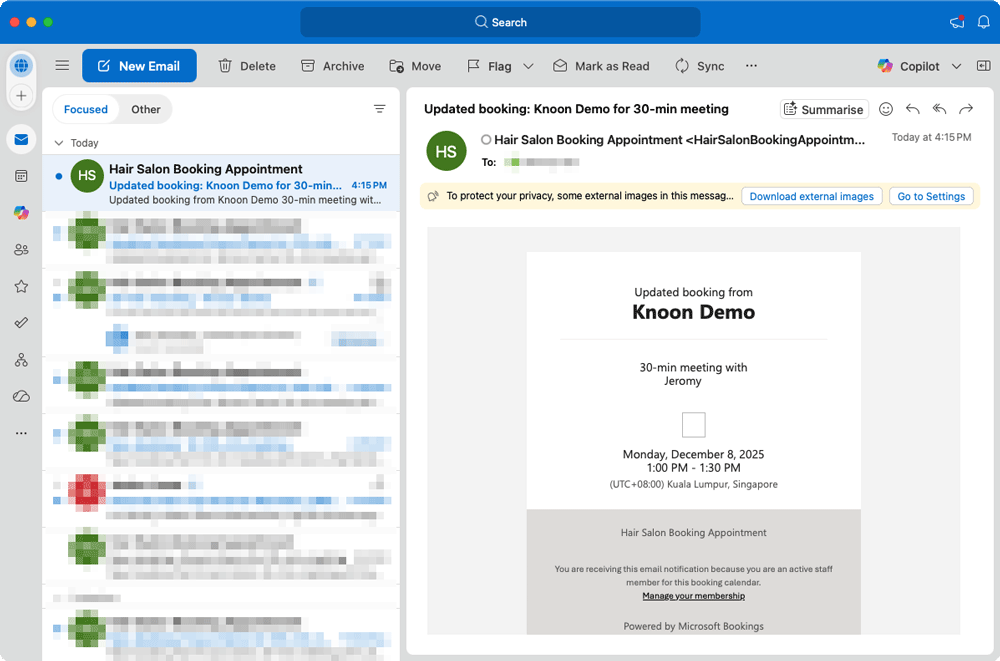
All events flow through Microsoft Bookings into Outlook and Teams, lowering the risk of double bookings.
Natural User Experience
With Knoon, customers can speak naturally, such as “book me at three on Thursday,” and the agent understands the intent, checks availability, and completes the booking.
Traditional chatbots rely on rigid scripts and keyword matching, often forcing users through buttons or strict phrasing. Knoon’s agentic AI interprets flexible language and performs real actions in Microsoft Bookings, creating a smooth, human-like experience.
How to Build Your AI Booking System
Building an AI powered booking system with Knoon and Microsoft Bookings is quick and straightforward. You will create your Bookings tools, connect key workflows, test the booking experience, and finally embed your chat agent on your website or WhatsApp Business.
Here is how to do it step by step.
Step 1: Create and Equip Your Microsoft Bookings Tool in Knoon
To connect your Microsoft Bookings calendar with Knoon, start by creating a dedicated tool that allows the agent to read availability, create appointments, update bookings, and cancel events.
Create a Microsoft Bookings Tool
- Open Knoon.
- Navigate to Bots → Tools.
- Click Create.
- Enter a name and description for your tool.
- (Optional) Enable Provide alternative description to LLM for clearer instructions.
- Set Tool Type to App.
- Click Select an App Action.
- Choose Microsoft → Microsoft Bookings.
- Select an action such as:
- List Staff Members
- List Booking Availability
- Create Booking Appointment
- Update Booking Appointment
- Cancel Booking Appointment
- Search Appointments
- Define your agent variables as needed.
- Configure the action payload using those variables.
- Click Submit.
Attach the Tool to an Agent
- Go to Bots → Agents.
- Select an existing agent or create a new one.
- Scroll to the Tools section.
- Add the Microsoft Bookings tool you created.
- Click Submit.
Your agent is now fully equipped to check availability, recommend times, schedule bookings, and update or cancel appointments directly in conversation.
Step 2: Set Up Your Workflow with Multiple Bookings Tools
For a complete booking experience, your agent will use a collection of Microsoft Bookings tools. In this example, we walk through a hair salon called Beauty, staffed by two stylists: Jeromy and Kenny. The salon uses Knoon to handle all booking requests through chat while Microsoft Bookings manages the scheduling.
To automate scheduling, you will create 6 Microsoft Bookings tools:
- Check Availability (List Booking Availability)
- Create Appointment (Create Booking Appointment)
- Find Existing Appointment (Search Appointments)
- Preferred Stylist (List Staff Members)
- Update Appointment (Update Booking Appointment)
- Cancel Appointment (Cancel Booking Appointment)
Below is a step-by-step guide for setting up each tool.
Check availability of the hair salon appointment slots
- In the create a new tool page,
Name: Check availability of the hair salon appointment slots
Description: Check availability of the appointment slots before booking or updating of appointment. - Choose App as the Tool Type.
- Press Select an App Action.
- Pick Microsoft → Microsoft Booking → List Booking Availability.
- Select a booking business.
- Configure the agent variables.
Name:startDate
Description:Start date of the query in ISO8601.
Name:endDate
Description:End date of the query in ISO8601. - Configure the action payload.
startDate:{{startDate}}
endDate:{{endDate}} - Done!
Preferred Hair Stylist
- In the create a new tool page,
Name: Preferred Hair Stylist
Description: Choose a preferred stylist from the list of the staff members. - Choose App as the Tool Type.
- Press Select an App Action.
- Pick Microsoft → Microsoft Booking → List Staff Members.
- Select a booking business.
- Done!
Book an hair salon appointment
- In the create a new tool page,
Name: Book an hair salon appointment
Description: Create a hair salon appointment booking - Choose App as the Tool Type.
- Press Select an App Action.
- Pick Microsoft → Microsoft Booking → Create Booking Appointment.
- Select a booking business.
- Configure the agent variables.
Name:startDateTime
Description:This is the start date time in ISO 8601.
Name:endDateTime
Description:This is the end date time in ISO 8601.
Name:customerName
Description:The name of the customer
Name:staffMemberIDs
Description:The staffMemberID of the hairstylist staff members. - Configure the action payload.
startDateTime:startDateTime
endDateTime:endDateTime
customerName:customerName
customerEmailAddress:{{data.contact.email}}
staffMemberIDs:staffMemberIDs - Done!
Get existing appointment information
- In the create a new tool page,
Name: Get existing appointment information
Description: Get existing appointment information. - Choose App as the Tool Type.
- Press Select an App Action.
- Pick Microsoft → Microsoft Booking → Search Appointments.
- Select a booking business.
- Configure the agent variables.
Name:startDate
Description:Start date of the query in ISO8601.
Name:endDate
Description:End date of the query in ISO8601. - Configure the action payload.
startDate:{{startDate}}
endDate:{{endDate}}
customerEmail:{{data.contact.email}} - Done!
Update hair salon appointment
- In the create a new tool page,
Name: Update hair salon appointment
Description: Update booking appointment in the hair salon after confirming slot availability. - Choose App as the Tool Type.
- Press Select an App Action.
- Pick Microsoft → Microsoft Booking → Update Booking Appointment.
- Select a booking business.
- Configure the agent variables.
Name:appointmentId
Description:The appointmentId of the appointment to be updated.
Name:startDateTime
Description:Start date time of the appointment in ISO8601.
Name:endDateTime
Description:End date time of the appointment in ISO8601.
Name:staffID
Description:This is the staffID. - Configure the action payload.
appointmentID:appointmentID
startDateTime:start-time
endDateTime:end-time
matchedCustomerEmailAddress:{{data.contact.email}}
staffID:staffID - Done!
Cancel hair salon appointment
- In the create a new tool page,
Name: Cancel a hair salon appointment.
Description: Cancel a hair salon booking appointment. - Choose App as the Tool Type.
- Press Select an App Action.
- Pick Microsoft → Microsoft Booking → Cancel Booking Appointment
- Select a business booking.
- Configure the agent variables:
Name:appointmentID
Description:This is the appointmentID to be cancelled.
Name:reasonOfCancellation
Description:State the reason(s) to cancel the appointment. - Configure the action payload.
appointmentID:{{appointmentId}}
matchedCustomerEmailAddress:{{data.contact.email}}
cancellationMessage:{{reasonOfCancellation}} - Done!
Each tool requires variables and payload fields such as date ranges, staff IDs, appointment IDs, customer email, and start or end times. Once configured, attach all tools to your agent so it can perform the entire scheduling workflow autonomously.
Step 3: Test the Booking Flow
Once the tools are installed and connected to your agent, you can begin testing:
- Ask the agent to find available slots.
- Choose a preferred stylist.
- Confirm a booking.
- Request a reschedule.
- Test cancelling an appointment.
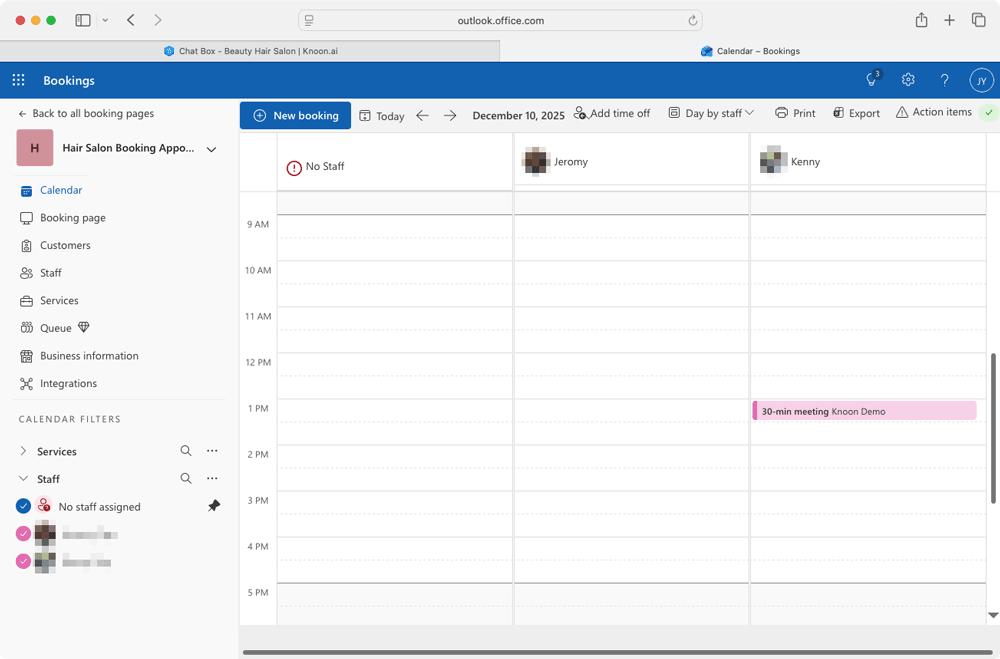
Ask the agent to book a 1 PM slot next week with stylist Kenny
We asked the agent to book a 1 PM appointment next week with stylist Kenny. The agent checked Kenny’s schedule and confirmed that he was available Monday through Friday from 9 AM to 5 PM, meaning a 1 PM slot was open on any weekday.
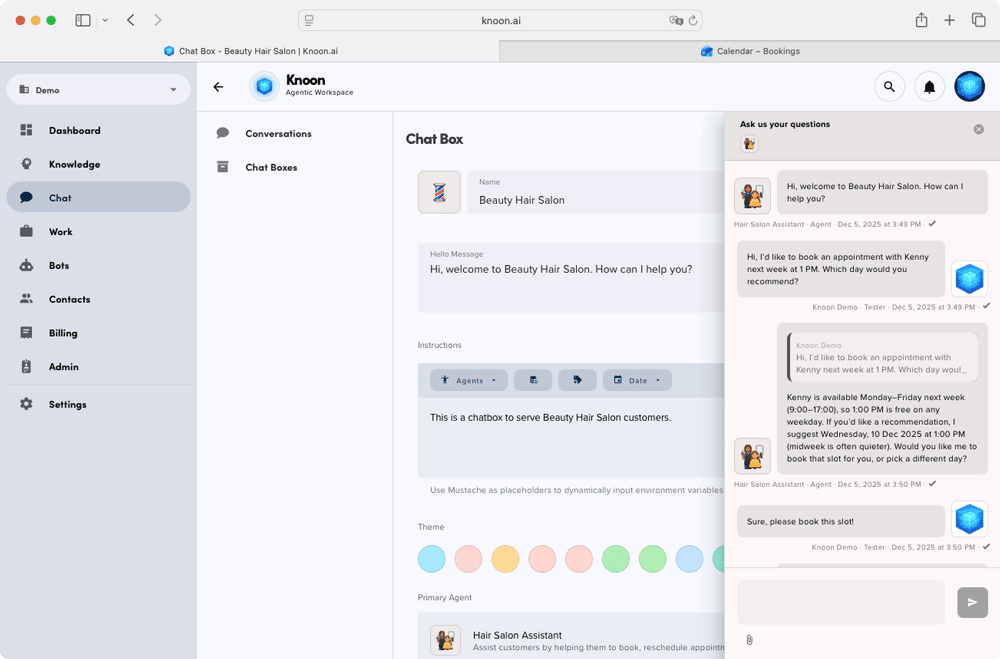

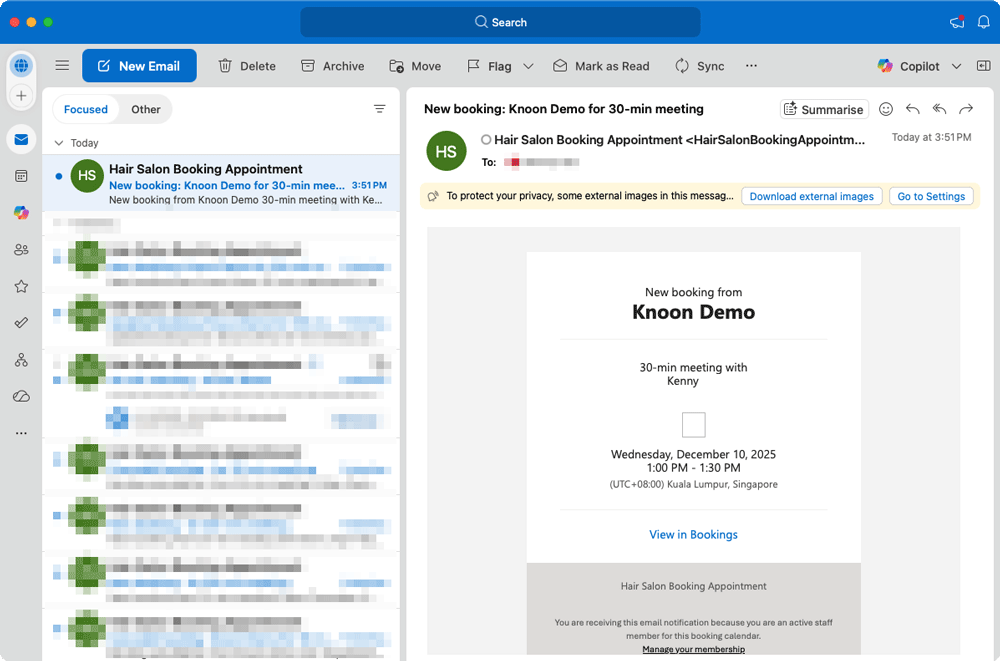
It then suggested a quieter midweek option: Wednesday, 10 December 2025 at 1 PM. After we confirmed the choice, the agent proceeded to create the booking, and the appointment with Kenny was successfully scheduled.
Change appointment to another date and time
We then asked the agent to check whether an appointment was scheduled for the following week, and if so, to reschedule it to Monday at 1 PM with the same stylist. The agent located the existing booking on Wednesday, 10 December 2025 at 1 PM, and reviewed the stylist’s availability for the requested time. It found that Kenny, the current stylist, was not available at 1 PM on Monday, but identified that another stylist, Jeromy, was free.
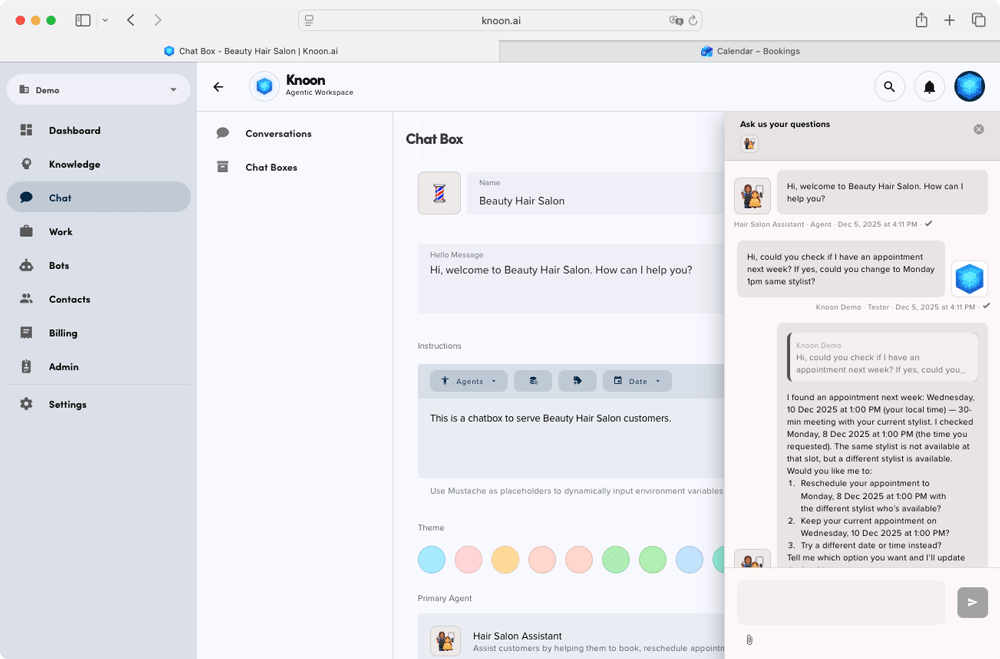
The agent provided clear options:
- Switch to Monday at 1 PM with Jeromy, keep the original Wednesday appointment
- Explore different times
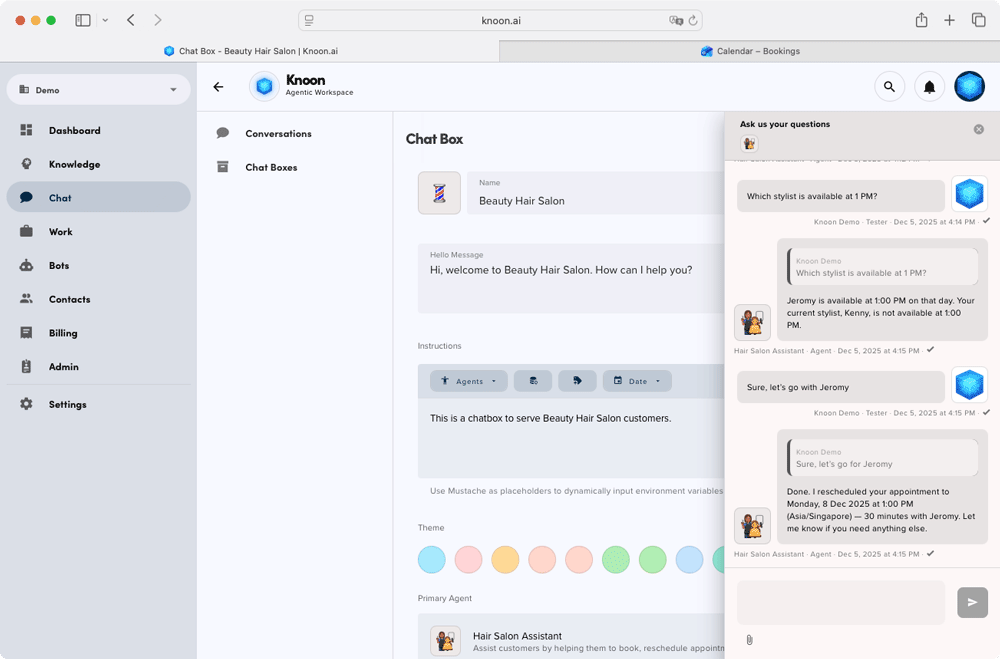
After confirming that Jeromy was acceptable, the agent retrieved the event details and updated the appointment to the new date and time.
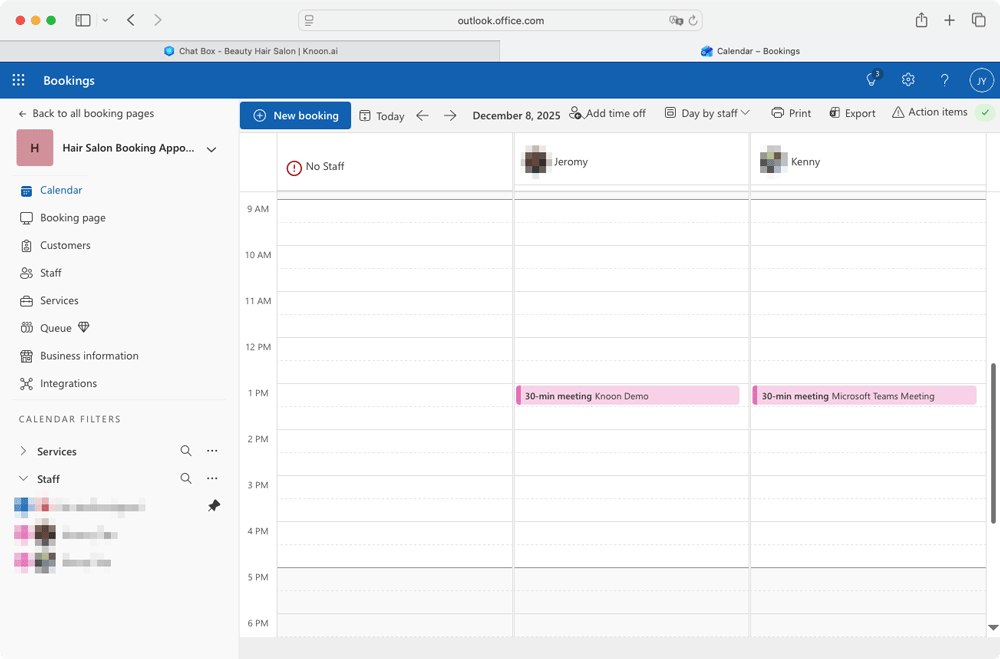
The appointment was successfully rescheduled to Monday, 8 December 2025 at 1 PM for 30 minutes with Jeromy.
And just like that, the entire adjustment was handled automatically, with no manual coordination required.
Cancel Appointment
Finally, we tested appointment cancellation. The user requested to cancel their appointment for the following week. The agent began by confirming whether it should look up any appointment scheduled between Monday, 8 December and Sunday, 14 December, or cancel a specific booking if an appointment ID or exact time was provided. It also asked for a reason to record for the cancellation.
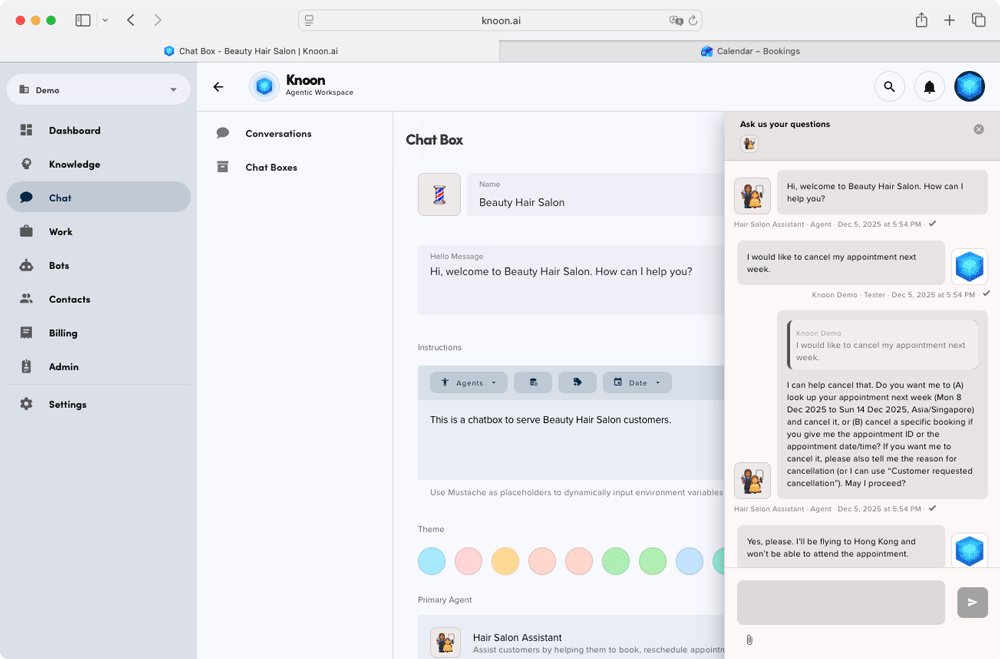
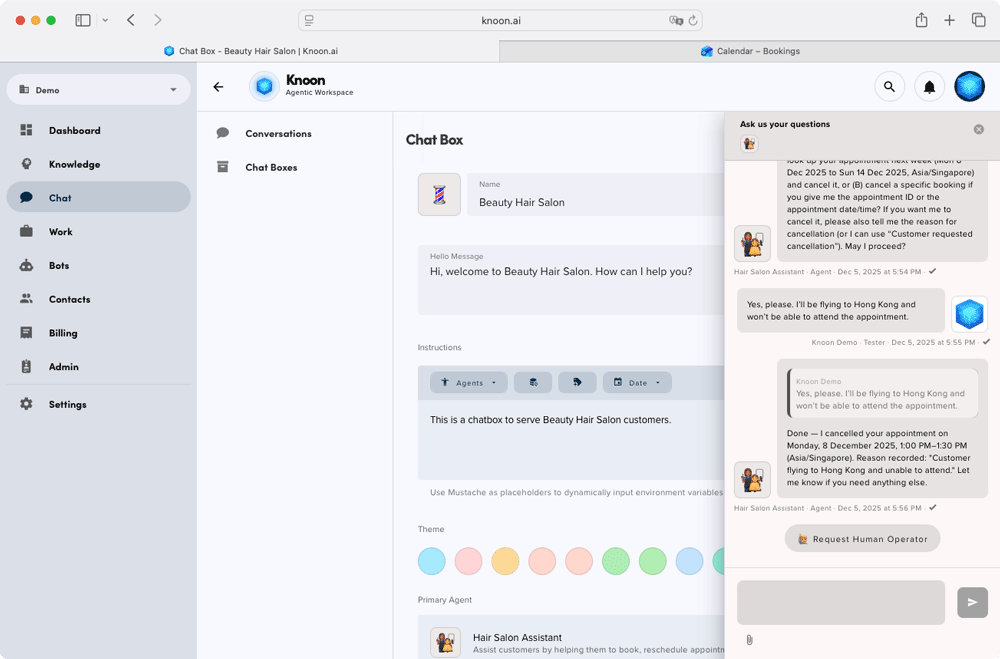
After the user explained that they would be flying to Hong Kong and unable to attend, the agent searched for the upcoming appointment and identified the booking on Monday, 8 December at 1 PM. It then proceeded to cancel the appointment and recorded the provided reason.
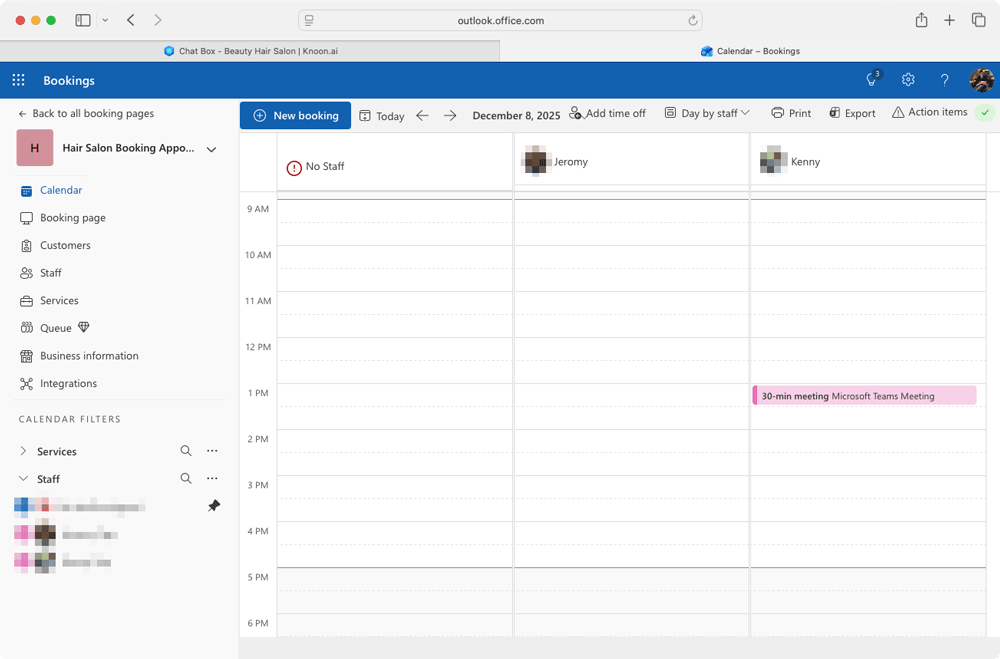
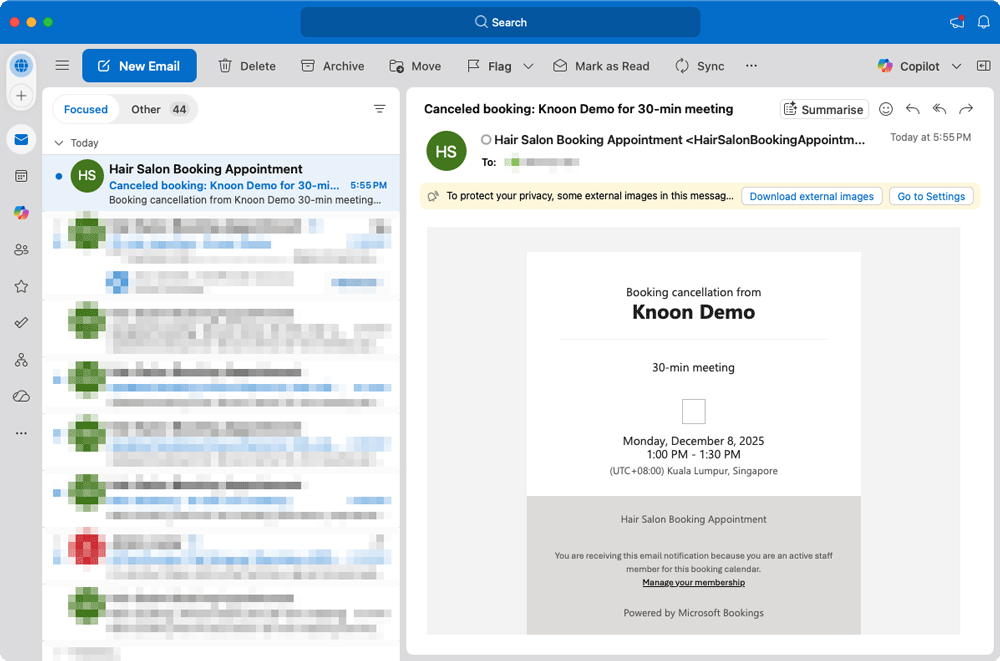
The appointment was successfully removed from the calendar, completing the entire process automatically.
Step 4: Embed Your Chat Agent on Your Website or Run It in WhatsApp Business
With your Microsoft Bookings tools connected and your Knoon agent fully configured, the final step is to bring your AI booking experience directly to your customers. Knoon makes it simple to deploy your agent across multiple channels so users can book appointments wherever they already are.
Embed the Chat Agent on Your Website
You can add Knoon’s chat widget to any webpage with a single script.
This gives visitors an instant, conversational way to schedule appointments without navigating booking forms.
To embed the chat agent:
- Go to Knowledge → Knowledge Bases in Knoon.
- Select the Knowledge Base you want to embed.
- In the Chat Box section, click the ⋮ menu.
- Choose Chat Kit.
- Copy the generated code snippet.
- Paste it into your website’s HTML, just before the closing
</body>tag.
Your AI booking assistant will immediately appear as a floating chat widget, ready to greet customers and help them book, reschedule, or cancel appointments.
Run Your Agent on WhatsApp Business (Coming soon)
If your customers prefer messaging over chat widgets, you can bring the same booking experience into WhatsApp using WhatsApp Business API. This feature is coming soon!
By combining Microsoft Bookings with Knoon’s agentic AI, businesses can turn traditional scheduling into a seamless, conversational experience. Customers book, reschedule, or cancel appointments using natural language, while the agent handles availability checks, staff assignment, and calendar updates automatically. This reduces administrative effort, improves accuracy, and delivers a smoother experience than manual booking forms or scripted chatbots.
With Knoon’s simple setup and flexible deployment across websites and WhatsApp Business, you can launch a fully automated AI booking assistant in under an hour and transform how your business manages appointments.